A Beginner’s Guide to JavaScript Programming: Dive headfirst into the wild world of web development! This isn’t your grandpappy’s coding – JavaScript is the engine that makes the internet *actually* work, powering everything from interactive websites to mind-blowing animations. We’ll unravel its mysteries, from the simple “Hello, world!” to manipulating the very fabric of web pages. Get ready to build something awesome.
This guide will take you step-by-step through the fundamentals, from setting up your environment and understanding basic syntax to mastering DOM manipulation, event handling, and asynchronous programming. We’ll cover essential concepts like variables, functions, arrays, and objects, all explained in a way that’s clear, concise, and (dare we say) fun. By the end, you’ll have the foundational skills to start crafting your own dynamic web experiences.
Introduction to JavaScript
JavaScript: It’s the unsung hero behind much of the interactive magic you experience on the web. From dynamic website elements to complex web applications, JavaScript is the engine that drives it all. Understanding its fundamentals is key to unlocking a world of web development possibilities.
JavaScript’s Purpose and Uses
JavaScript is a programming language primarily used to make websites interactive. Think of it as the spice that adds flavor to a website’s otherwise static presentation. It allows developers to create dynamic content that responds to user actions, enhancing the overall user experience. This ranges from simple animations and form validations to complex features like real-time chat applications and interactive maps. Essentially, if a website feels engaging and responsive, JavaScript is likely playing a crucial role.
A Brief History of JavaScript
JavaScript’s journey began in 1995 at Netscape Communications. Brendan Eich developed it in just 10 days, originally named Mocha, then LiveScript, and finally settling on JavaScript (though it’s technically unrelated to Java). Its initial purpose was to add interactivity to web pages, a stark contrast to the static HTML websites of the time. Since then, it has evolved significantly, becoming a cornerstone of web development and expanding beyond the browser to encompass server-side programming (Node.js) and mobile app development (React Native).
Examples of Websites Utilizing JavaScript
Many websites rely heavily on JavaScript. Consider popular platforms like YouTube, where JavaScript powers video playback, comments, and recommendations. Gmail utilizes JavaScript for its interactive interface and email management features. Even simple websites incorporate JavaScript for subtle enhancements, like smooth scrolling or image carousels. Essentially, most modern websites use JavaScript in some capacity, often extensively.
A Simple “Hello, world!” Program in JavaScript
The classic introduction to any programming language is the “Hello, world!” program. In JavaScript, it’s incredibly straightforward:
This code snippet uses the `console.log()` function to display the message “Hello, world!” in the browser’s developer console. To see this output, open your browser’s developer tools (usually by pressing F12) and navigate to the “Console” tab. This simple example demonstrates the basic syntax and functionality of JavaScript, providing a foundation for more complex programs.
Setting up Your Environment
So, you’re ready to dive into the world of JavaScript? Awesome! Before you start crafting amazing web applications, you’ll need to set up your coding environment. Think of it like prepping your kitchen before baking a delicious cake – you need the right tools and ingredients! This section will guide you through the essential steps.
Setting up your JavaScript environment involves installing Node.js and npm (Node Package Manager), choosing a code editor, and organizing your project files. Let’s get started!
Node.js and npm Installation
Node.js is a JavaScript runtime environment that lets you run JavaScript code outside of a web browser. npm is a package manager that helps you easily install and manage libraries and tools for your projects. Installing both is a straightforward process. Head to the official Node.js website (nodejs.org). Download the installer appropriate for your operating system (Windows, macOS, or Linux). Run the installer, following the on-screen instructions. Once installed, you can verify the installation by opening your terminal or command prompt and typing `node -v` and `npm -v`. This will display the versions of Node.js and npm installed, confirming everything is working correctly.
Using a Code Editor: Visual Studio Code, A Beginner’s Guide to JavaScript Programming
Choosing the right code editor is crucial for a smooth coding experience. Visual Studio Code (VS Code) is a popular, free, and highly customizable editor that’s perfect for beginners. It offers features like syntax highlighting (making your code easier to read), intelligent code completion (helping you write code faster), and extensions (adding extra functionality). Download VS Code from code.visualstudio.com and install it. Once installed, you can explore its features and customize it to your preferences. The intuitive interface makes it easy to navigate and use, even for those new to coding.
Setting up a Basic Project Folder Structure
Organizing your project files is key to avoiding chaos and frustration, especially as your projects grow. A simple and effective structure is to create a folder for each project. Inside that folder, create subfolders for your JavaScript files (`js`), CSS files (`css`), HTML files (`html`), and any other assets (images, etc., in a folder called `assets`). This keeps everything neatly organized and easily accessible. For example, a project called “MyFirstProject” might have this structure:
MyFirstProject/
├── js/
│ └── script.js
├── css/
│ └── styles.css
├── html/
│ └── index.html
└── assets/
└── image.jpg
Helpful Resources for Beginners
Starting your JavaScript journey can feel overwhelming, but thankfully, there are many resources to help you along the way.
- MDN Web Docs: This is the ultimate resource for JavaScript documentation. It’s comprehensive, well-organized, and easy to navigate. Consider it your JavaScript bible.
- freeCodeCamp: Offers interactive coding challenges and projects to help you learn JavaScript practically.
- Codecademy: Provides structured courses and tutorials on various programming languages, including JavaScript.
- YouTube Tutorials: Numerous YouTube channels offer beginner-friendly JavaScript tutorials. Search for “JavaScript tutorial for beginners” to find a style that suits you.
Basic JavaScript Syntax
JavaScript’s syntax forms the foundation of your programming journey. Understanding its core elements – variables, data types, operators, and control flow – is crucial for building any JavaScript application. This section breaks down these fundamentals with clear examples, ensuring you grasp the basics before moving on to more advanced concepts.
Variables
Variables are containers for storing data. They’re declared using the `let`, `const`, or `var` s. `let` and `const` are preferred in modern JavaScript. `let` declares a variable whose value can be changed, while `const` declares a variable whose value cannot be reassigned after its initial declaration (though the contents of an object or array assigned to a `const` can still be modified). `var` is an older with function scope, which can lead to unexpected behavior, so its use is generally discouraged.
Examples:
“`javascript
let age = 30;
const name = “Alice”;
var city = “New York”; // Less preferred
“`
Data Types
JavaScript supports several fundamental data types. Understanding these is essential for writing correct and efficient code. The following table summarizes common data types:
| Data Type | Description | Example |
|---|---|---|
| Number | Represents both integer and floating-point numbers. | let x = 10; let y = 3.14; |
| String | Represents text, enclosed in single (‘ ‘) or double (” “) quotes. | let message = "Hello, world!"; |
| Boolean | Represents truth values: `true` or `false`. | let isAdult = true; |
| Null | Represents the intentional absence of a value. | let user = null; |
| Undefined | Represents a variable that has been declared but has not been assigned a value. | let price; // price is undefined |
| Symbol | Represents a unique and immutable value. | let id = Symbol('id'); |
| Object | A collection of key-value pairs. | let person = name: "Bob", age: 25 ; |
| Array | An ordered list of values. | let numbers = [1, 2, 3, 4, 5]; |
Operators
Operators perform operations on variables and values. JavaScript offers various operators, including arithmetic (+, -, *, /, %), comparison (==, ===, !=, !==, >, <, >=, <=), logical (&&, ||, !), and assignment (=, +=, -=, *=, /=). Examples: ```javascript let sum = 10 + 5; // Addition let isEqual = (5 == "5"); // Loose equality (true) let isStrictlyEqual = (5 === "5"); // Strict equality (false) ```
Control Flow Statements
Control flow statements determine the order in which code is executed.
If/Else Statements
If/else statements execute different blocks of code based on a condition.
Example:
“`javascript
let temperature = 25;
if (temperature > 20)
console.log(“It’s warm!”);
else
console.log(“It’s cool.”);
“`
Switch Statements
Switch statements provide a concise way to handle multiple conditions based on the value of an expression.
Example:
“`javascript
let day = “Wednesday”;
switch (day)
case “Monday”:
console.log(“Start of the week!”);
break;
case “Wednesday”:
console.log(“Mid-week!”);
break;
default:
console.log(“Another day.”);
“`
Loops
Loops repeatedly execute a block of code until a condition is met.
For Loop
The `for` loop is used for iterating a specific number of times.
Example:
“`javascript
for (let i = 0; i < 5; i++)
console.log(i);
```
While Loop
The `while` loop continues as long as a specified condition is true.
Example:
“`javascript
let count = 0;
while (count < 5)
console.log(count);
count++;
```
Do-While Loop
The `do-while` loop is similar to the `while` loop, but it executes the code block at least once before checking the condition.
Example:
“`javascript
let i = 0;
do
console.log(i);
i++;
while (i < 5);
```
Program Demonstrating Concepts
This program calculates the area of a rectangle based on user input, showcasing variables, data types, operators, and control flow. Error handling is included to ensure robustness.
“`javascript
let length = prompt(“Enter the length of the rectangle:”);
let width = prompt(“Enter the width of the rectangle:”);
if (isNaN(length) || isNaN(width) || length <=0 || width <=0) console.log("Invalid input. Please enter positive numbers."); else let area = parseFloat(length) * parseFloat(width); console.log("The area of the rectangle is: " + area); ```
Working with Functions
Functions are the building blocks of reusable code in JavaScript. Think of them as mini-programs within your larger program, designed to perform specific tasks. Using functions makes your code more organized, easier to understand, and less prone to errors – basically, they’re your secret weapon for writing cleaner, more efficient JavaScript.
Functions allow you to break down complex problems into smaller, manageable chunks. This modular approach improves readability and maintainability, especially as your projects grow in size and complexity. Imagine trying to build a house without prefabricated components – it would be chaotic! Functions are those prefabricated components, allowing you to build your JavaScript applications more efficiently.
Function Declaration and Invocation
A function is defined using the `function` , followed by the function name, parentheses `()`, and curly braces “ containing the function’s code. The parentheses hold any input parameters (arguments) the function might need. To use a function (or “invoke” it), you simply call it by its name, followed by the parentheses.
For example:
“`javascript
function greet(name)
console.log(“Hello, ” + name + “!”);
greet(“World”); // Output: Hello, World!
“`
Here, `greet` is the function name, `name` is a parameter, and `”Hello, ” + name + “!”` is the code executed when the function is called. `greet(“World”)` is the function invocation, passing “World” as the argument.
Anonymous Functions
Anonymous functions, as the name suggests, are functions without a name. They are often used as arguments to other functions or assigned to variables. This is particularly useful when you need a function for a one-time use, or when working with higher-order functions (functions that take other functions as arguments).
“`javascript
let myFunc = function(x, y)
return x + y;
;
console.log(myFunc(5, 3)); // Output: 8
“`
In this example, `function(x, y) return x + y; ` is an anonymous function assigned to the variable `myFunc`.
Arrow Functions
Arrow functions provide a more concise syntax for writing functions, especially anonymous ones. They use the `=>` symbol to separate the parameters from the function body.
“`javascript
let add = (x, y) => x + y;
console.log(add(5, 3)); // Output: 8
“`
This arrow function achieves the same result as the anonymous function example above, but with significantly less code. Arrow functions are particularly useful in situations where you need a short, simple function.
Passing Arguments and Returning Values
Functions can accept multiple arguments, separated by commas within the parentheses. The `return` statement specifies the value the function sends back to the part of the code that called it. If a function doesn’t have a `return` statement, it implicitly returns `undefined`.
“`javascript
function calculateArea(width, height)
return width * height;
let area = calculateArea(10, 5); // area will be 50
“`
This `calculateArea` function takes two arguments (`width` and `height`) and returns their product.
Modularizing Code with Functions
Functions are crucial for creating modular code. By breaking down your program into smaller, self-contained functions, you improve code organization, reusability, and maintainability. This makes debugging and future modifications significantly easier.
For example, instead of writing all the code for a webpage’s user interface in one large block, you can separate it into functions for handling different parts of the interface (e.g., a function for creating the navigation bar, another for creating the main content area, and so on). This makes the code far easier to manage and update.
DOM Manipulation
So, you’ve grasped the basics of JavaScript – variables, functions, the whole shebang. Now it’s time to level up and learn how to interact directly with the structure of web pages. This is where the Document Object Model (DOM) comes into play. Think of the DOM as a JavaScript representation of your HTML, a tree-like structure that allows you to access and modify every element on the page. It’s your secret weapon for creating dynamic and interactive websites.
The Document Object Model (DOM) is a programming interface for HTML and XML documents. It represents the page so that programs can change the document structure, style, and content. Essentially, it’s a way for JavaScript to talk to and change your HTML. This opens up a world of possibilities for making your web pages come alive.
Selecting Elements
Selecting specific elements within the DOM is the first step to manipulation. JavaScript offers several ways to do this. The most common method uses the `document.querySelector()` and `document.querySelectorAll()` methods. `querySelector()` returns the first element that matches a specified CSS selector, while `querySelectorAll()` returns a NodeList (a collection) of all matching elements. For example, `document.querySelector(“#myElement”)` would select the element with the ID “myElement”, and `document.querySelectorAll(“.myClass”)` would select all elements with the class “myClass”.
Manipulating Element Content
Once you’ve selected an element, you can modify its content using various properties and methods. The `textContent` property allows you to directly set or get the text content of an element. The `innerHTML` property lets you set or get the HTML content, allowing for more complex manipulations. For instance, `document.getElementById(“myParagraph”).textContent = “This is new text!”` would replace the text within the element with the ID “myParagraph”. Similarly, `document.getElementById(“myDiv”).innerHTML = “
This is a new paragraph!
“` would replace the content of the div with a new paragraph.
Adding and Removing Elements
JavaScript provides methods to dynamically add and remove elements from the DOM. The `appendChild()` method adds a new child element to a parent element. The `removeChild()` method removes a child element from its parent. For example, to create a new paragraph element and add it to a div:
let newParagraph = document.createElement("p");

newParagraph.textContent = "This is a dynamically added paragraph!";

document.getElementById("myDiv").appendChild(newParagraph);
To remove an element:
let elementToRemove = document.getElementById("elementToRemove");

elementToRemove.parentNode.removeChild(elementToRemove);
Dynamic Webpage Update Example
Let’s create a simple program that dynamically updates the content of a webpage. This example uses a button to change the text of a paragraph.
This is the initial text.
This code creates a paragraph with the ID “myParagraph” and a button. When the button is clicked, the `changeText()` function is called, which updates the `textContent` of the paragraph. This demonstrates a basic but powerful example of DOM manipulation, showcasing how easily you can create interactive elements on your web pages.
Events and Event Handling
Source: oreilly.com
So you’re diving into our Beginner’s Guide to JavaScript Programming? Awesome! Building your freelance coding empire from home? Smart move, but remember to protect your hustle – check out this article on Why You Need Insurance When Starting a Home-Based Business before you really take off. Then, get back to mastering those JavaScript loops – you’ve got this!
JavaScript isn’t just about static content; it’s about making websites interactive. That’s where events and event handling come in. Events are actions or occurrences that happen in the browser, like a user clicking a button or moving their mouse over an image. Event handling is the process of writing code that responds to these events, bringing your website to life.
Events are the backbone of dynamic web pages. They allow you to create engaging user experiences, responding to user actions and updating the page accordingly. Understanding how to handle events is a crucial skill for any JavaScript developer.
Common JavaScript Events
Several common events are frequently used in web development. These events trigger specific actions when they occur, providing a robust framework for interactive web applications. Understanding their functionalities is fundamental to creating responsive and engaging user interfaces.
- click: This event occurs when a user clicks on an HTML element. It’s the most basic and frequently used event for handling button clicks, link navigation, and other user interactions.
- mouseover/mouseout:
mouseovertriggers when the mouse cursor moves over an element, whilemouseouttriggers when the cursor moves out. These are perfect for creating hover effects, changing the appearance of an element on mouse interaction. - submit: This event is fired when a form is submitted. It’s crucial for handling form data and preventing default form submission behaviors. You can use this to validate user input before sending data to a server.
Attaching Event Listeners
To make your JavaScript code react to events, you need to attach event listeners to HTML elements. This involves using methods that tell the browser what function to execute when a specific event occurs on a particular element. There are several ways to do this.
The most common method is using the addEventListener() method. This method takes two arguments: the event type (e.g., ‘click’, ‘mouseover’) and the function to be executed when the event occurs.
document.getElementById("myButton").addEventListener("click", myFunction);
In this example, myFunction will be executed whenever the element with the ID “myButton” is clicked. addEventListener allows you to attach multiple listeners to the same element for different events, making it highly versatile.
Interactive Form Example
Let’s create a simple interactive form that validates user input before submission. This demonstrates the practical application of event handling and provides a clear understanding of how to use events to enhance user experience.
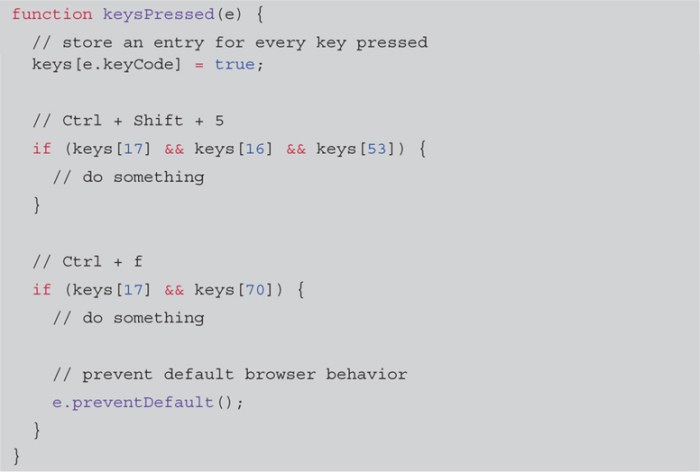
Imagine a form with a text input field and a submit button. We want to prevent submission if the input field is empty. Here’s how we can achieve this:
This code adds an event listener to the form’s submit event. The event.preventDefault() line prevents the default form submission behavior, allowing us to control what happens when the form is submitted. The code then checks if the name field is empty; if so, it displays an alert; otherwise, it simulates successful form submission.
Working with Arrays

Source: designveloper.com
Arrays are fundamental data structures in JavaScript, allowing you to store collections of items under a single variable name. Think of them as organized lists where each item has a specific position, starting from index 0. This makes them incredibly versatile for managing and manipulating data efficiently. Mastering arrays is key to building dynamic and responsive JavaScript applications.
Arrays offer a flexible way to group related data, whether it’s a list of names, numbers, or even other objects. This structured approach simplifies data management, making your code cleaner and easier to understand. We’ll explore several common array methods that will empower you to perform various operations on your array data with ease.
Array Methods
Several built-in methods simplify array manipulation. Understanding these methods is crucial for writing efficient and concise JavaScript code. They provide shortcuts for common operations, avoiding the need for manual looping and iteration in many cases.
- push(): Adds one or more elements to the end of an array. For example,
myArray.push("new item");adds “new item” to the end ofmyArray. - pop(): Removes the last element from an array and returns it.
myArray.pop();removes and returns the last element ofmyArray. - splice(): A powerful method for adding or removing elements at any position within an array. It takes arguments specifying the starting index, the number of elements to remove, and any elements to add. For example,
myArray.splice(2, 1, "inserted item");removes one element starting at index 2 and inserts “inserted item” at that position. - filter(): Creates a new array containing only elements that pass a provided test function. For example,
let evenNumbers = numbers.filter(number => number % 2 === 0);creates a new arrayevenNumberscontaining only the even numbers from thenumbersarray. - map(): Creates a new array by applying a provided function to each element in the array. For example,
let doubledNumbers = numbers.map(number => number * 2);creates a new arraydoubledNumberswhere each element is double the value of the corresponding element in thenumbersarray.
Iterating Over Arrays
Looping through arrays is essential for accessing and processing individual elements. JavaScript offers several ways to achieve this, each with its own strengths and weaknesses.
Let’s say we have an array called `myData` containing [10, 20, 30, 40, 50].
- `for` loop: Provides precise control over iteration.
for (let i = 0; i < myData.length; i++) console.log(myData[i]);This iterates through each element by index. - `for...of` loop: A more concise way to iterate directly over the values.
for (let value of myData) console.log(value);This directly accesses each value in the array. - `forEach()` method: A convenient method for iterating and performing actions on each element.
myData.forEach(value => console.log(value));This uses a callback function to process each element.
Using Arrays to Store and Manipulate Data
Arrays are incredibly useful for managing collections of information. Consider a scenario where you're building a simple e-commerce application. You might use arrays to store product information:
Imagine an array storing product details:
let products = [

   name: "Shirt", price: 25, quantity: 10 ,

   name: "Pants", price: 50, quantity: 5 ,

   name: "Hat", price: 15, quantity: 20

];
Using array methods, you can easily update inventory, calculate total value, or filter products based on price or availability. For instance, to find all products costing more than $20, you could use the `filter` method:
let expensiveProducts = products.filter(product => product.price > 20);
This demonstrates how arrays, combined with their methods, provide a structured and efficient way to manage complex data within your JavaScript applications.
Introduction to Objects
JavaScript objects are like containers that hold collections of data, much like real-world objects. Think of a car: it has properties like color, model, and year, and methods like start() and stop(). In JavaScript, we represent this using objects. They're fundamental to building complex and organized applications. Understanding objects is crucial for mastering JavaScript's capabilities.
Creating and Using Objects
Objects are created using curly braces ``. Inside, we define key-value pairs, where keys are strings (usually enclosed in quotes) representing the properties, and values are the data associated with those properties. For example, let's create a `car` object:
```javascript
const car =
color: "red",
model: "Toyota Camry",
year: 2023,
start: function()
console.log("Car started!");
,
stop: function()
console.log("Car stopped!");
;
console.log(car.color); // Output: red
car.start(); // Output: Car started!
```
This creates a `car` object with properties `color`, `model`, and `year`, and methods `start` and `stop`. Methods are functions associated with the object. We access properties using dot notation (`.`) like `car.color`.
Accessing and Modifying Object Properties
Accessing object properties is straightforward using dot notation, as shown above. To modify a property, simply assign a new value:
```javascript
car.color = "blue";
console.log(car.color); // Output: blue
```
We can also use bracket notation (`[]`) to access properties, particularly useful when property names are dynamic or contain spaces:
```javascript
const propertyName = "model";
console.log(car[propertyName]); // Output: Toyota Camry
```
Representing Real-World Entities with Objects
Objects excel at modeling real-world entities. Consider a `person` object:
```javascript
const person =
firstName: "Alice",
lastName: "Smith",
age: 30,
address:
street: "123 Main St",
city: "Anytown",
zip: "12345"
;
console.log(person.address.city); // Output: Anytown
```
Here, the `address` property itself is another object, demonstrating nested objects. This allows for complex data structures mirroring real-world relationships.
Arrays vs. Objects
The following table compares arrays and objects, highlighting their key differences:
| Feature | Array | Object | Example |
|---|---|---|---|
| Data Structure | Ordered list of values | Collection of key-value pairs | |
| Access | By index (numerical position) | By key (string) | `myArray[0]`, `myObject.name` |
| Keys | Numerical indices (0, 1, 2, ...) | Strings (usually) | |
| Use Cases | Lists, sequences | Representing entities, structured data | `[“apple”, “banana”]`, `name: “John”, age: 30` |
Asynchronous JavaScript
Source: freecodecamp.org
JavaScript, by default, is synchronous. This means it executes code line by line, waiting for each operation to complete before moving on to the next. However, in the world of web development, especially with tasks like fetching data from a server or manipulating large datasets, this approach can lead to significant delays and a frustrating user experience. Asynchronous JavaScript allows us to handle these time-consuming operations without blocking the execution of other code, maintaining responsiveness and a smooth user experience.
Asynchronous programming enables JavaScript to perform multiple operations concurrently without waiting for each one to finish before starting the next. Imagine downloading multiple images for a webpage. A synchronous approach would download each image one after another, significantly increasing the load time. An asynchronous approach, on the other hand, would initiate the downloads concurrently, greatly reducing the overall loading time. This is crucial for creating dynamic and responsive web applications.
Promises
Promises are a powerful mechanism for handling asynchronous operations in JavaScript. A promise represents the eventual result of an asynchronous operation, which can be either a fulfilled value or a rejected reason. They provide a cleaner and more manageable way to handle asynchronous code compared to traditional callbacks. A promise has three states: pending (initial state), fulfilled (operation completed successfully), and rejected (operation failed).
Here's a simple example of using a promise to fetch data from a server:
fetch('https://api.example.com/data')

  .then(response => response.json())

  .then(data =>

    // Process the data here

    console.log(data);

  )

  .catch(error =>

    // Handle errors here

    console.error('Error fetching data:', error);

  );
This code snippet uses the `fetch` API, which returns a promise. The `.then()` method handles the fulfilled state, allowing us to process the received data. The `.catch()` method handles the rejected state, providing a mechanism for error handling.
Async/Await
Async/await makes asynchronous code look and behave a bit more like synchronous code, enhancing readability and maintainability. The `async` declares an asynchronous function, while `await` pauses execution until a promise resolves.
Let's rewrite the previous example using async/await:
async function fetchData()

  try

    const response = await fetch('https://api.example.com/data');

    const data = await response.json();

    console.log(data);

   catch (error)

    console.error('Error fetching data:', error);
fetchData();
This version is arguably more readable and easier to follow, resembling the structure of synchronous code. The `try...catch` block neatly handles potential errors.
Methods for Handling Asynchronous Operations
Beyond promises and async/await, other methods exist for managing asynchronous tasks. These include callbacks (though less preferred for complex scenarios due to "callback hell"), and event listeners, commonly used for handling user interactions and browser events. The choice of method often depends on the complexity of the task and personal preference, with promises and async/await generally being recommended for their improved readability and error handling capabilities.
Importance of Asynchronous Programming in Web Development
Asynchronous programming is vital for building responsive and efficient web applications. Without it, long-running operations would block the user interface, leading to a poor user experience. Consider a scenario where a user submits a form. If the submission process is synchronous, the user would see a frozen interface while the server processes the request. Asynchronous operations allow the user interface to remain responsive while the background tasks are executed, leading to a smoother and more enjoyable user experience. This is especially crucial for applications with frequent user interactions or those dealing with large datasets or external APIs.
Debugging JavaScript Code
So, you've written some JavaScript, and it's... not working exactly as planned. Don't panic! Debugging is a crucial skill for any programmer, and JavaScript, with its dynamic nature, can sometimes throw some curveballs. This section will equip you with the tools and strategies to troubleshoot your code effectively. Think of it as your JavaScript detective kit.
Debugging involves identifying and resolving errors in your code. JavaScript errors can range from simple typos to complex logical flaws, often leading to unexpected behavior or crashes. Fortunately, modern browsers provide powerful debugging tools, and mastering these tools is key to becoming a proficient JavaScript developer.
Common JavaScript Errors and Identification
JavaScript errors manifest in various ways. Syntax errors, like forgetting a semicolon or misspelling a , are usually caught by the JavaScript interpreter before the code runs, often displayed as red underlines or error messages in your code editor. Runtime errors, on the other hand, occur while the code is executing. These can be things like trying to access a property of an undefined object (e.g., `myObject.property` when `myObject` doesn't exist), using a variable before it's been assigned a value, or attempting to perform an operation on incompatible data types (e.g., adding a number to a string). Logical errors are trickier; the code runs without throwing errors, but it produces incorrect results. These often require careful examination of your code's logic and flow. Identifying the error type is the first step towards fixing it.
Using Browser Developer Tools for Debugging
Modern browsers (Chrome, Firefox, Safari, Edge) include built-in developer tools that are incredibly helpful for debugging. These tools typically offer a debugger, console, network tab, and other features. The debugger allows you to step through your code line by line, inspect variables, and set breakpoints (points in your code where execution pauses). Imagine it like a slow-motion replay of your code, allowing you to see exactly what's happening at each step. The console lets you print variable values, test expressions, and see error messages. Let's say you have a function that's supposed to add two numbers:
```javascript
function addNumbers(a, b)
return a + b;
```
If you suspect a problem, you can set a breakpoint inside the function in your browser's debugger. When the breakpoint is hit, you can inspect the values of `a` and `b` to verify they're what you expect. The console also allows you to directly call `addNumbers(5, 3)` and see the result.
Using Console Logging for Debugging
Console logging is a simple yet powerful technique. The `console.log()` method lets you print messages and variable values to the browser's console. This is incredibly useful for tracking the values of variables at different points in your code. For example:
```javascript
let x = 5;
let y = 10;
console.log("x:", x, "y:", y); // Prints "x: 5 y: 10" to the console
let sum = x + y;
console.log("sum:", sum); // Prints "sum: 15" to the console
```
Strategic placement of `console.log()` statements can help you pinpoint where your code is going wrong. You can log intermediate results, function arguments, and return values to monitor the flow of data. Remember to remove or comment out these `console.log()` statements once you've identified and fixed the issue, to keep your code clean.
A Debugging Strategy for Beginners
A systematic approach is crucial. First, read error messages carefully. They often provide clues about the location and nature of the problem. Next, use your browser's developer tools to inspect the code's behavior. Set breakpoints to step through the code and examine variable values. Use `console.log()` to track variables and intermediate results. If you're dealing with a logical error, try simplifying the code to isolate the problematic part. Test your code frequently and incrementally, adding functionality in small, manageable steps. Don't be afraid to experiment and try different approaches. Finally, remember that debugging is an iterative process. You might need to repeat these steps multiple times before you find and fix the bug.
Closure: A Beginner's Guide To JavaScript Programming
So, you've conquered the basics of JavaScript – congratulations! You've unlocked the power to create interactive and engaging web experiences. Remember, this is just the beginning of your coding journey. Keep practicing, keep experimenting, and keep building. The web is your oyster – now go forth and code!


